Wednesday, April 6, 2011

Protect our Oceans!


Sigh. I've been anticipating this lesson with mixed emotions. I've been talking to the class about the environmental disaster that has become our oceans and how fish and other wildlife are affected by human behaviour.
Prime example:
"A dead gray whale washed ashore on West Seattle's Arroyo Beach last week. In itself, that is not an inherently unusual occurrence: five to ten gray whales die annually in Puget Sound waters, unable to complete the lengthy migration from the lagoons of Baja California, where they breed, to their summer feeding waters north of Alaska. Indeed, that whale was the fourth discovered in the region in a little over a week.

What was especially interesting about this particular whale, however, was its stomach contents. According to a postmortem examination by Cascadia Research:

The animal had more than 50 gallons of largely undigested stomach contents consisting mostly of algae but also a surprising amount of human debris including more than 20 plastic bags, small towels, surgical gloves, sweat pants, plastic pieces, duct tape, and a golf ball." (full article here)

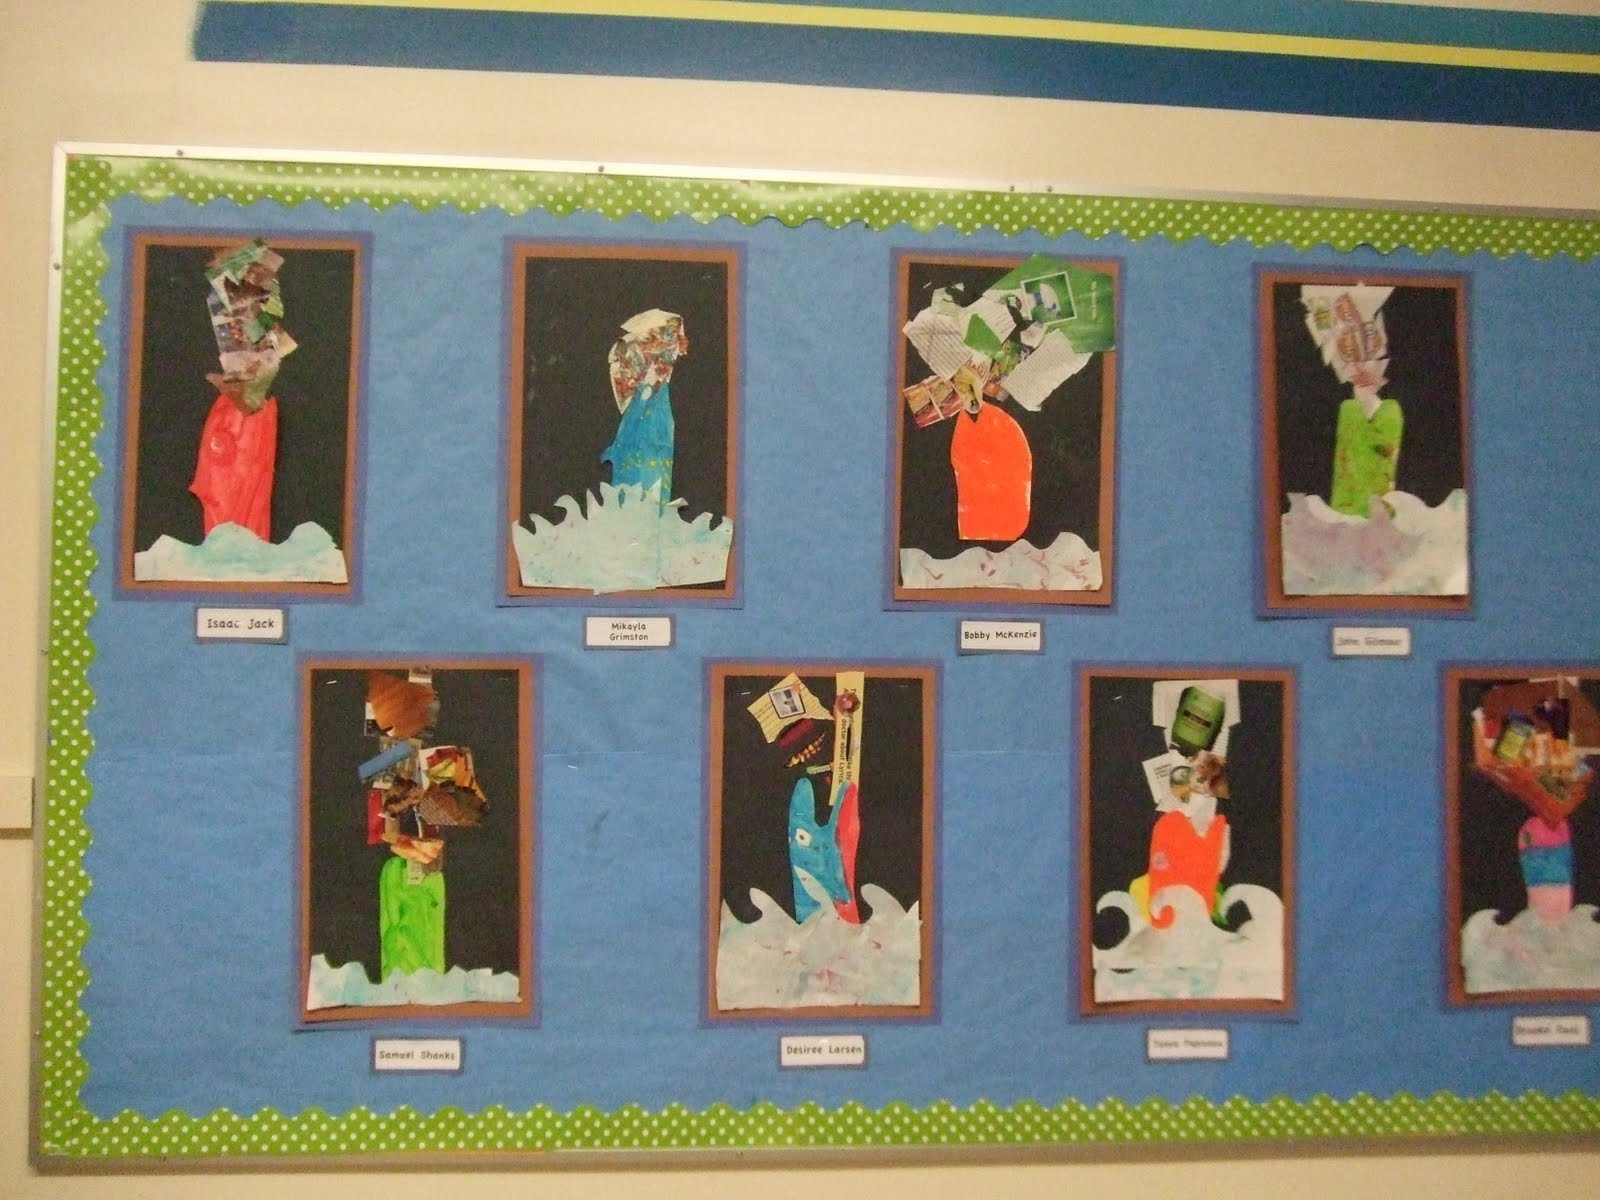
In browsing some of the eco-friendly lesson plans in the dungeon at the school, I found a cool image of a sort of collage, depicting a fish eating garbage. PERFECT! I thought - high interest, relevant, socially-conscious art, that fits with my theme and will be displayed for Earth Day! And thus I began...

I started by making some oily water with the kids, using my favourite shaving-cream marbling technique on finger-paint paper. This they cut out to make the waves.


Then they painted fish *with open mouths!!


Finally, they glued everything on, and did a great collage of words (I thought representing the rhetoric?! and then bits of "garbage"- I tried to get them to focus on plastics).


Love how this worked, and how we used some recycled material to make it!

La pluie de printemps... April Showers...


I have started a water unit with my class and we are looking at the water cycle, water creatures and water states.
Given that we live in the rainiest place EVER, I decided to brighten our days with some rainbows. Such an easy, classic project, I actually left it for my sub the other day, but the kids loved it, and I loved the different textures.
-I used 2- 9x12 paper, cut into an arc (these you glue back to back)
-the middle of the arc got glued on the end to support the cotton ball cloud
-on the other end, a piece of tinfoil was snipped at the end and the lengths curled around a pencil for the rain.
The rainbow:

This second piece was the activity to go with a little Science lesson on water permeability... what fabrics or materials repel water, which ones soak it in.. I found this cute jacket template (actually there were 2 to choose from) they coloured it front and back, then cut it out, and wrapped it in saran-wrap! easy, fun!

Les Lucioles dans la Lumière de la Lune


Moonlit Fireflies!
We also did the moonlit fireflies lesson, originally presented by Marymaking, then also done by smART Class
It tied in very nicely with our space and moon unit in March.
I was impressed at how dry-brushing poster paint onto black paper worked!
That was how we started, using cool colours (blue, purple and green). Then the kids painted a paper plate (the thin kind with the ribbed edge) with pearlescent paint. They had the choice to make a full moon, or a half (quarter, etc) moon. This was perfect tie in, as we've been tracking the moon's phases, and they knew that the moon was always round, just not always completely showing.
They made fireflies out of bits of cardboard, glued bits of gold pipecleaner for the "tail" and googly eyes!

We used silver paint to dot on stars and finished the piece by highlighting the edge of the moon with yellow pastel and drew treetops with green and brown pastels.

Thursday, March 10, 2011

It's a Jungle out there!

With my English Art class, I am very crunched for time, and the attention span of some of them is quite short. It's been difficult for me to come up with meaningful projects that are do-able! I've found 2 projects in Mes premiers pas d'artiste (Heritage jeunesse), which I think I got through scholastic.
The first one I did was Birds of Paridise.

The kids chose 1 colour to paint their hand, printing it twice for the wings. They continued with the same colour and painted the head, body and tail. While the other kids were waiting for the paint station, they worked on making hibiscus flowers and palm fronds to decorate the display. After it was dry, on day 2(!), kids used pastels to draw patterns and designs on their birds. The BEST part was getting to use real feathers to add texture and interest to their birds. The kids were quite happy with how they turned out.

The second project in the jungle theme were VERY simple giraffes and zebras. I stole these from a birthday party my children were at. Kids from 2-5 were making them, so I figured they were do-able in less-than 20 minutes with 7 and 8 year olds! My fabulous birthday-party-planning-queen friend had a station at the party with everything pre-cut and ready to go. Bless her, she was more than happy that I took all of the leftovers!
For the head shape, she traced her kids' shoes (they are small!), then she found some fabulous fringe to use as the hair. The kids painted the stripes and spots, and glued on googly-eyes.. who can resist googly eyes?!

This week's jungle-themed project involves hippos! Last year I was looking at apple separators (like what they use to layer apples in a box) and thought it looked like rippling water. I did a fun project where the kids coloured hippo templates and cut them so they looked submerged in water, then added water-lilies. Cute, sure, (sorry, no pics!) But this year, I'm combining this idea with the other idea in the aforementioned book, and we are making standing hippos in the "river".
We started with a template of a hippo, very basic, on one half of a piece of cardstock. The children folded the paper, then cut it out to have a standing beast.
Next, we took tissue paper (various colours) and cut them into shapes and glued them with liquid glue onto the hippos.

The hippos were placed on the river and secured with large puddles of glue... this was the trickiest part to figure out, if anyone has suggestions for improvement, please share!

La Nuit Étoilée- Van Gogh


inspiration:

My new cricut! hee hee!

This is another project I did last year, borrowed from Art Projects for Kids. I actually did 3 versions of this one last year, with grades 1, 2 and 4, but this year's batch turned out the best, so far!
I started by giving each child a blue piece and a black half the size of construction paper. They had to use a ruler (tricky!) to draw a cityscape. The hardest part was cutting this out without cutting buildings off.. the goal was to have ONE piece of black to glue!

Before we glued, however, we used blues and yellows to create the stars, moon, and the movement of the sky. We talked about how the planet moves and the moon moves around the Earth. I love the "movement" on this one! This little gal moves a lot in class too!

I love it when I connect Fine Art with Science and French.. a 3-for-1 deal in this lesson!

Un Voyage dans l'Espace


- our new unit in French is about Space! I have been getting excited for this month as I have 3 bang-up projects to do with the kids.
The first one is the titular "Deep Space Sparkle" project from Patty's fabulous blog that I found last year. I can't quite find it now with her new formatting, but basically I meshed her ideas with the inspiration painting: Kandinsky's Several Circles No. 323 (Cercles divers No. 323):

Students started by tracing an odd number of circles in various sizes. They then colour them in with oil pastels.
Paint around them with two coats of black poster paint.
Meanwhile, the students made rocket ships using white glue and bits of boxes that they pieced together. These they painted with either cool or warm colours.
After the black paint was dried, the rockets were glued to the "space" background and I added some *sparkles* - I liked how sometimes the glue trailed a little creating a sort of meteor effect.

This is the second year in a row that I've done these and every one turns out amazing! It was the class's idea to mount them all together so that it looks like a universe, and I really appreciate that idea and the effect it produces!

Wednesday, February 23, 2011

PSYKO!!!!

Quick note: here's an AMAZING site: psykopaint I have had so much fun creating away! You have to check it out yourselves!! Here's the one I spent until midnight last night working on!


Also, I think most Art teachers have found this one.. The Google Art Project but it's always good to put it here, so that I can remind myself of it!